Friday, March 16, 2012

Cream Cheese Truffles

I came across this recipe from one of my fellow friends off YouTube, how to make truffles.


This recipes calls for:                          

8oz of cream cheese (at room temperature)
semi-sweet chocolate (about 20oz)
toothpicks
bowl
spoon
cookie sheet
wax paper

sprinkles (optional)


1. In a stand mixer, or with a hand-held mixer:
 beat the cream cheese + equal parts melted chocolate.

(to get melted chocolate. You can microwave it at 30 second bursts, but careful not to burn the chocolate. Or you can use the double-boiler method, which I personally prefer....You have better control of the temperature).

2. Mix everything together, then refrigerate for about 15 minutes, for it to firm up.

3. Line your cookie sheet with wax paper.

4. Take an ice cream spoon, or eye-ball it (you want even sizes) of the mixture into small round balls.

5. Melt another equal portion of chocolate.

6. Place the toothpicks into each truffle. (this makes the next step alot easier to work with).

7. Take each ball, and dip it into the chocolate, covering it fully. (you can use a spoon to help apply the mixture).

8. Set onto the wax paper yet again, remove the toothpick and fill in the holes with added chocolate.

9. You may at this stage add the sprinkles. Totally optional.

10. Continue till you have completed all the balls.

11. Place in freezer for about 30 minutes, till nice and firm.


This may seem like many steps, but trust me it really isn't.

In my experience making these I did use 70% cocoa dark chocolate. So it wasn't as sweet as it should have been, but that is what I had on hand, so that is what I used.

Next time, I would be adding more cream cheese to my recipe, as I did not really taste the cheese (plus I really, really love cheese).


This recipe MUST be REFRIDGERATED!!!
Play around with the recipe and see what you like best! :)

Wednesday, March 14, 2012

Banana Loaf

One evening with nothing to do, I noticed I have ripe bananas that no one was gonna eat, so not to waste them I decided to make a banana loaf. I went on the internet and came across this recipe and decided to give it a shot.


Here are some ingredients you will need:


·        1/2 cup butter
·         1 cup white sugar
·         2 eggs
·         3 ripe bananas, mashed
·         2 cups all-purpose flour
·         1 teaspoon baking soda
·         1 teaspoon baking powder
·         1/2 teaspoon salt
·         1/2 cup chopped walnuts


Directions

1.     Preheat oven to 350 degrees F (175 degrees C). Lightly grease a 9x5 inch loaf pan.
2.     In a large bowl, cream together the butter and sugar until light and fluffy. Stir in the eggs one at a time, beating well with each addition, stir in the mashed bananas.
3.     In a large bowl, sift together flour, baking powder, baking soda, salt. Blend the banana mixture into the flour mixture; stirring just to combine. Fold in the nuts.
4.     Bake in preheated oven for 60 minutes, until a toothpick inserted into center of the loaf comes out clean.


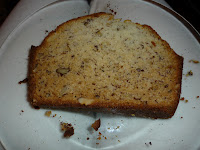
      This is how it turned out, following exactly the instructions of the recipe, and leaving it in for 60 minutes.

      My advice is to check the loaf after 50 minutes, because I did find it was a little burnt around the edges which I didn't care for. I would of like it a little more moist, so next time I will be checking it after 50 minutes, which  should make a difference. All in all, I would be making this recipe again, with the addition of vanilla, because I love vanilla.  :)

Hope you enjoy!

Saturday, March 10, 2012

Cute additives for the baker in your home!

This article goes out to ALL you bakers out there, specifically to those with children. Children are such visual characters, they thrive on anything that might entertain them. So why not please their eye while baking as well. If choosing a theme for the cake, cupcake, or whatever it is you're baking why not embellish it with something cute.

Try these "Wilton" icing decorations.

They are sure to please anyone in the family. Themes such as: Disney princess, rubber duckies, Hello Kitty, and many more to choose from. There is always something for everyone. 

Made from:
Sugar, egg white solids, distilled vinegar, sodium benzoate (preservative) natural mint flavor, and FD&C colorants.

Can be found:
In most groceries stores in the baking isle.

Perfect for:
Cake decorating, muffins, cupcakes, etc...


Early Spring

The best time to start any seed planting is in late winter, early spring season. Start with some potting soil and add your seeds. Keep on watering those plants now, to start the germination process. Keep them near a window, with a lot of sunlight. In a few weeks you will notice little stems coming up and soon a new plant will be grown.

You can plant peppers, herbs,  tomatoes are very popular, and then transfer them into your garden when the weather is nice and warm outside. They will continue to get bigger and by Autumn time you will have your vegetables ready to eat.

Go start your planting season right away to enjoy your fresh, homegrown fruits & vegetables.
You will be proud you did! :)

Gardening, Cooking, Recipes and Much More...

I am a girl who loves a home cooked meal. I enjoy the simplicity of cooking and knowing that I can control each ingredient I put into the dish. My passion for cooking all started when I ended up taking care of my grandparents. Being an elder and with the dangers of cooking, and burning pots and pans, I took over the kitchen. I started using simple ingredients and with time each ingredient became something more special.

Being around my grandparents and watching them tend to their garden, I truly started to appreciate what mother nature had to offer. From home grown tomatoes, cucumbers, lettuce, zucchini's, beans and many more healthy and nutritious fruits & vegetables.

I always watched my grandparents do their thing in their gardens, but there did come a time when they weren't able to continue as they were getting older. So, to keep the tradition going, I went out and started my own little home garden. I planted some tomatoes, cucumbers, beans, herbs, and other goodies. I watered them, and watched them grow. My garden is my pride and joy. Just knowing that I can plant a little seed and the outcome becomes a plant, ready to eat is just incredible to me.

So, there you have it, as simple as that is, this is how my passion for cooking came to be!